GAP Guardian v3.0 - Administration Guide
Introduction
This article explains how to administer GAP Guardian devices via the GAP Portal.
Contents
- How to configure tenant-level default app settings
- How to configure Quick Call button setting
- Creating a new device
- How to send a location request
- How to send a check-in request
- How to perform a manual check-in
- How to declare an emergency
- How to acknowledge an emergency
- How to cancel an emergency
- How to send a text message
- How to change which app features are enabled
- How to change app settings
- How to deactivate the app
Configuring Tenant-Level Defaults
You can now set up default settings for new instances of the app on a per-tenant basis. When a new app instance is activated, the tenant-level default settings will be applied. Note: changing these settings does not change the settings for existing, activated app instances.
How to configure tenant-level default app settings
To configure tenant-level default app settings:
- Click "Options"
- Click "Tenants"
- Click on the name of the tenant whose settings you wish to change
- Click "Default App Feature Settings"
- Click on the device type whose defaults you wish to change (either "GAP Guardian for Android" or "GAP Guardian for iOS")
- Select which app screens should be available by checking / unchecking options under the "App Features" section
- Select which actions should be performed upon app start-up by checking / unchecking options under the "Start-Up Options" section
- Set the default setting values for each app feature using the drop-down lists under the "Monitor Me", "Location Service Settings", "Tracking Mode" and "SOS Mode" sections
- Click "OK"

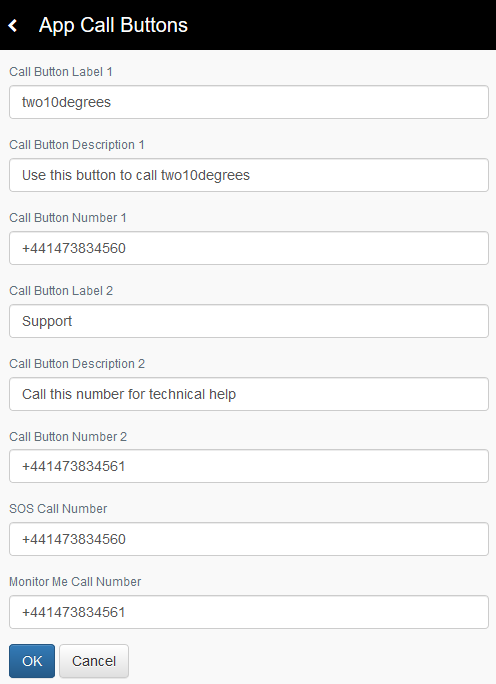
How to configure Quick Call button settings
To configure the app's Quick Call function:
- Click "Options"
- Click "Tenants"
- Click on the name of the tenant whose settings you wish to change
- Click "App Call Buttons"
- Enter up to 2 numbers, labels and descriptions into the relevant text boxes
- Enter up to 2 numbers, one for SOS calls and one for Monitor Me calls into the "SOS Call Number" and "Monitor Me Call Number" text boxes respectively
- Click "OK"
Creating a new device
To create a new GAP Guardian device, click "Devices" then "+". You will need to enter the following information:
- Device Id - a unique ID for the device (such as the IMEI)
- Friendly Name - the display name of the device
- Assigned User - the user to whom the device is assigned
- Description (optional) - a description of the device
- Phone Number (MSISDN) - the device's phone number (in international format)
You will also need to select a map icon and map icon colour.
When complete, click "OK".
Remote Administration
How to send a location request
To request the current location of the device:
- Click "Devices"
- Click the name of the device to which you wish to send the command
- Click "Request Location"
It may take a few minutes for the current location to be returned via a message in the Inbox.
How to request a check-in
To request that the user checks in:
- Click "Devices"
- Click the name of the device to which you wish to send the command
- Click "Request Check-In"
- Select how long the user should have to check in before they their device enters an overdue state using the "Check-In Period" drop-down list
- Click "Send"
How to perform a manual check-in
You can manually check in a user (for example, if their device is not working) via the "Manual Check-In" button:
- Click "Devices"
- Click the name of the device you wish to manually check in
- Click "Manual Check-In"
- Click "Yes, Check In"
How to declare an emergency
You can declare an emergency on behalf of the device user. This will send a command to their device to activate SOS mode.
- Click "Devices"
- Click the name of the device to which you wish to send the command
- Click "Declare Emergency"
- Click "Yes, Declare Emergency"
How to acknowledge an emergency
When a device is in an emergency state, you can acknowledge an emergency. This will send a message to the device to that effect:
- Click "Devices"
- Click the name of the device to which you wish to send the command
- Click "Acknowledge Emergency"
- Click "Yes, Acknowledge Emergency"
How to cancel an emergency
When a device is in an emergency state, you can cancel an emergency from the Portal. This will send a message to the device to deactivate SOS mode:
- Click "Devices"
- Click the name of the device to which you wish to send the command
- Click "Cancel Emergency"
- Click "Yes, Cancel Emergency"
How to send a text message
To send the device a text message:
- Click "Devices"
- Click the name of the device to which you wish to send the message
- Click "Send Text Message"
- Enter the message in the text box
- Optionally, check the "Force SMS" check box to send the message as an SMS rather than a push notification (note: this will incur a charge and the message will appear in the device's default messaging app, rather than GAP Guardian)
- Click "Send"
How to change which app features are enabled
To change which app features are enabled:
- Click "Devices"
- Click the name of the device whose features you wish to change
- Click "Configure"
- Click "Feature Settings"
- Select which app screens should be available by checking / unchecking the options listed
- Click "Send"
How to change app settings
To change the app's settings:
- Click "Devices"
- Click the name of the device whose settings you wish to change
- Click "Configure"
- Click "Application Settings"
- Select which actions should be performed upon app start-up by selecting "Update start-up options" from the "Start-Up Options" drop-down list and then checking / unchecking the options that appear
- Set the default setting values for each app feature using the drop-down lists under the "Monitor Me", "Location Service Settings", "Tracking Mode" and "SOS Mode" sections
- Click "Send"

How to deactivate the app
You can deactivate an app so that the user's configuration is deleted from the device and they are returned to the Login screen:
- Click "Devices"
- Click the name of the device whose settings you wish to change
- Click "Configure"
- Click "Deactivate"
- Click "Yes, Deactivate"