Managing Event Notifications
There are two types of Event Notifications:
- Event Notifications (which apply to individual devices)
- Global Event Notifications (which apply to more than one device in the same tenant)
Event Notifications are used to raise alerts when certain events occur such as:
- Geofences being crossed
- Emergency button being pressed
- Low battery
- Missed check-in
Note: You must first create at least one Contact or Distribution List in a tenant before creating an Event Notification rule.
Adding an Event Notification for an individual device
- Click "Devices"
- Click on the device for which you want to create the notification
- Click "Configure
- Click "Event Notifications"
- Click "+" to begin the wizard
Events
The first step is to set up the events when you want the Notification to fire. Multiple event may be selected by clicking "+ Add Event". When a second event is added you will be asked if you want the Notification to fire when any or the events occur or when all the events occur.
For example, you could use the any option to create a notification that fires when the device is overdue or the device sends an emergency message
Alternately, the all option could be used to create a notification that fires when a device sends a position message and the time is between 9 AM and 5 PM.
After all events have been added click "Next"
Actions
On the Actions step, first select the Event Severity. This will determine the color of the notifications that are emailed to recipients and alerts that appear on the portal.
An alert can be shown on the portal by clicking the "Raise an Alert on Dashboard" option.
Finally recipients from the Address Book can be added and notified when the notification fires. Additional recipients can be added by clicking "+ Add Recipient".
You can create address book contacts from this screen using the "Add New Global Contact" and "Add New Device Contact" option.
Dynamic Recipients
As well as specifying contacts and distribution lists (which contain "static" recipients - i.e. recipients whose contact details do not change unless you update them), it's also possible to send notifications to recpients that update automatically, for example:
- Assigned user - the user to whom the device that generated the notification is assigned
- Assigned user's manager - the manager of the user to whom the device that generated the notification is assigned
- Assigned user's emergency contacts - the emergency contacts of the user to whom the device that generated the notification is assigned
Note: If any of the above information is not specified for a given user of a device (or if the device does not have a user assigned), a notification will not be sent.
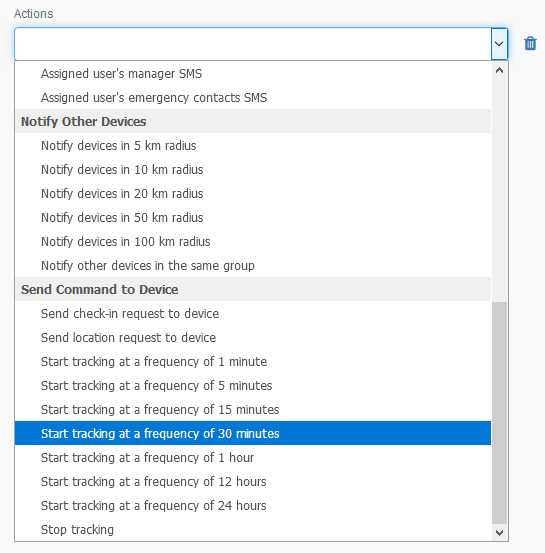
You can also notify other GAP devices that are within up to 100KM of the event. Only devices that have reported their position inside the chosen radius within the last 48 hours will be notified.
To notify nearby devices, select the appropriate radius under the "Notify Nearest Devices" heading from the "Send a message to the following recipient" drop-down list on the "Actions" tab of the New Event Notification wizard.
You can also notify other GAP devices in the same group as the device that generated the notification.
Note: the most appropriate mechanism for sending a text message will be used. For Lone Worker app devices, this will be via a push notification. Some devices do not support text messages and so will not be notified.
Commands
You can now specify that certain actions are taken if event notification criteria are met - for example, sending a check-in request or changing a device's reporting frequency. This enables powerful new workflows such as - "if a device enters a geofence, increase reporting frequency to once a minute" or "if a device goes overdue, send a check-in request".
The following commands are currently supported:
- Send a check-in request
- Send a location request
- Start tracking at a specific interval
- Start tracking at currently configured interval
- Stop tracking
- Start assigned check-in schedule
- Stop assigned check-in schedule
- Start monitoring
- Stop monitoring
- Send text message
- Call device
Note: supported commands and tracking frequencies will vary from device to device. If a device targeted by an event notificaiton rule does not support the command in question, no action will be taken.
Name
Enter a name for the notification in the "Notification Name" field so you can find it later.
Next, enter any text you want to be included when the Event Notification is raised. This might be "Device is overdue".
Finally, select if you want the notification to be enabled or disabled.
Summary
The summary screen will show you an overview of the event you have just created. Click "Previous" if you need to change anything or "OK" to finish creating the notification.
Edit an Event Notification for an individual device
- Click "Devices"
- Click on the device for which you want to create the notification
- Click "Configure
- Click "Event Notifications"
- Select the Event Notification you wish to edit
- Amend the details as required
- Click "OK"
Delete an Event Notification for an individual device
- Click "Devices"
- Click on the device for which you want to create the notification
- Click "Configure
- Click "Event Notifications"
- Select the Event Notification you wish to edit
- Click "Delete"
- Click "Yes, Delete"
Add a Global Event Notification for a Tenant or Group
- Click "Options"
- Click "Global Event Notifications"
- Click "+"
- Click "+" to begin the wizard
See above for information on the Events, Actions, Name and Summary Steps
Applies To
The "Applies To" step allows you to select the devices that the Global Event Notification will apply to. You can select for it to apply to all devices in a Tenant or Group.
You can also select the rule applies to all devices of a certain type by selecting the device type from the "Devices" drop down. Finally, if you select "Selected Devices" from the "Devices" drop down you will be shown all the device in the tenant and can select the individual devices for the rule to apply to.
Edit a Global Event Notification
- Click "Options"
- Click "Global Event Notifications"
- Select the Event Notification you wish to edit
- Amend the details as required
- Click "OK"
Delete a Global Event Notification
- Click "Options"
- Click "Global Event Notifications"
- Select the Event Notification you wish to delete
- Click "Delete"
- Click "Yes, Delete"
More Information
Please refer to the Event Notification Reference guide for an explanation of the meaning of each condition.