Understanding Geofences
Geofences are zones that can be used in event notifications. For example, you might want to be notified when a device enters or leaves a particular zone.
Each geofence has a "fence width" property. This value (in meters) defines how far inside or outside of the fence a device must go before a particular event notification is triggered.
There are three types of geofences:
- Line
- Circle
- Polygon
Line Geofences
Line geofences are particularly useful if you want alerts to be raised if a device does or does not conform to a particular route.
To create a line geofence:
- Click "Options"
- Click "Geofences"
- Click "+"
- Click the "Line" button
- Click on the map to begin drawing the line, clicking to place a point. To finish, click the end point.
- Enter a name for the geofence into the "Geofence Name" text box
- Enter a fence width into the "Fence Width (Meters)" text box
- Select a colour for the geofence from the "Geofence Color" picker
- Set a transparency value for the geofence using the "Geofence Transparency" slider
- Set the zoom level at which the geofence will appear on the map using the "Min Zoom" drop-down list. You can select the current zoom level using the "Use Current Zoom" button.
- Set the maximum zoom level at which the geofence will still appear on the map using the "Max Zoom" drop-down list. You can select the current zoom level using the "Use Current Zoom" button.
- Select a tenant under which the geofence should reside from the "Tenant" drop-down list
- If you want the geofence to be visible to sub-tenants of the tenant selected in the previous step, check the "Applies to above tenant and sub-tenants" option.
Circle Geofences
To create a circle geofence:
- Click "Options"
- Click "Geofences"
- Click "+"
- Click the "Circle" button
- Click on the map where you want the centre of the circle to be and drag outwards to expand it's radius.
- Enter a name for the geofence into the "Geofence Name" text box
- Enter a fence width into the "Fence Width (Meters)" text box
- Select a colour for the geofence from the "Geofence Color" picker
- Set a transparency value for the geofence using the "Geofence Transparency" slider
- Set the zoom level at which the geofence will appear on the map using the "Min Zoom" drop-down list. You can select the current zoom level using the "Use Current Zoom" button.
- Set the maximum zoom level at which the geofence will still appear on the map using the "Max Zoom" drop-down list. You can select the current zoom level using the "Use Current Zoom" button.
- Select a tenant under which the geofence should reside from the "Tenant" drop-down list
- If you want the geofence to be visible to sub-tenants of the tenant selected in the previous step, check the "Applies to above tenant and sub-tenants" option.
Polygon Geofences
To create a polygon geofence:
- Click "Options"
- Click "Geofences"
- Click "+"
- Click the "Polygon" button
- Click on the map where you want the the first point of the polygon to be and click at each vertex. Click the first point again to join up the polygon. You can add more points by dragging the transparent handle in the middle of two points to the desired location.
- Enter a name for the geofence into the "Geofence Name" text box
- Enter a fence width into the "Fence Width (Meters)" text box
- Select a colour for the geofence from the "Geofence Color" picker
- Set a transparency value for the geofence using the "Geofence Transparency" slider
- Set the zoom level at which the geofence will appear on the map using the "Min Zoom" drop-down list. You can select the current zoom level using the "Use Current Zoom" button.
- Set the maximum zoom level at which the geofence will still appear on the map using the "Max Zoom" drop-down list. You can select the current zoom level using the "Use Current Zoom" button.
- Select a tenant under which the geofence should reside from the "Tenant" drop-down list
- If you want the geofence to be visible to sub-tenants of the tenant selected in the previous step, check the "Applies to above tenant and sub-tenants" option.
Tagging Geofences
Once you've created a geofence, you can add tags to it. You might want to do this to indicate a speed limit or risk level, for example.
- Click "Options"
- Click "Geofences"
- Click on the name of the geofence you want to tag
- Click "Tag Geofence"
- Click "Add"
- Click "+"
- Enter the tag name (i.e. "Speed Limit") and the value (i.e. "55")
- Click "+ Add Tag" to add any additional tags and repeat as required
- Click "OK"
Geofence Notification Examples
Geofence notifications can be used to send a notification or raise an alert when a device is inside or outside a geofence or when a device enters or leaves a geofence. Creating a notification for one geofence is rather simple but multiple geofences may be used as well.
Inside
If using the notification “When the device is inside geofence” with multiple geofences, the notification will fire if the device is inside any of the geofences selected.
Using the inside rule and selecting both Safe Zones shown below, the rule would fire when the device reports from inside Save Zone 1 or from inside Safe Zone 2.
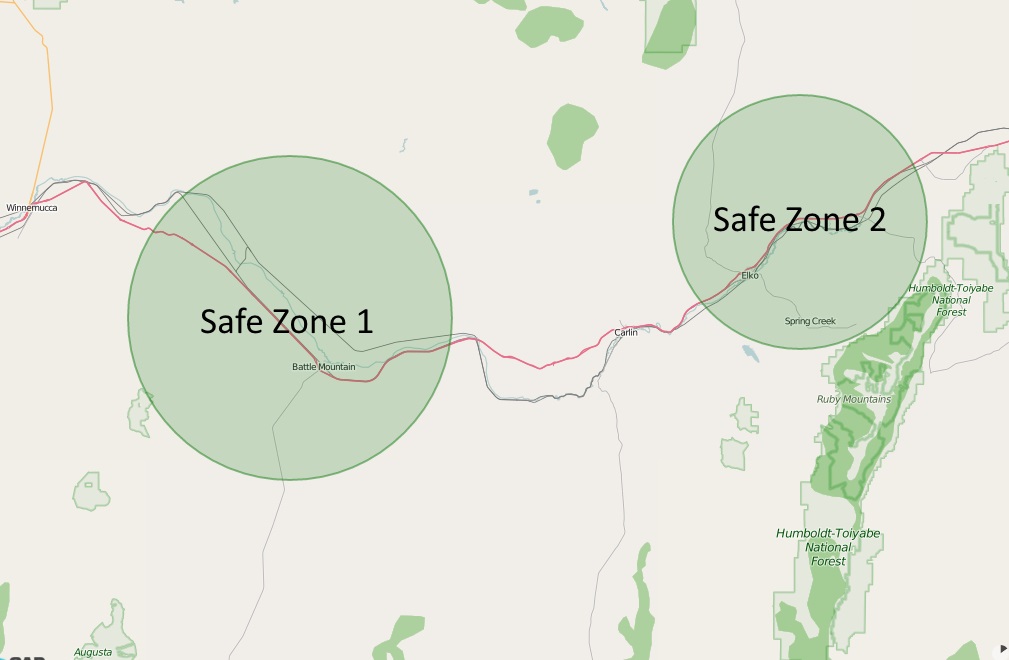
Outside
If using the notification “When the device is outside geofence” with multiple geofences, the notification will fire if the device is outside all of the geofences selected.
Using the outside rule and selecting both Safe Zones shown above, the rule would fire when the device reports from outside both Safe Zone 1 and Safe Zone 2.
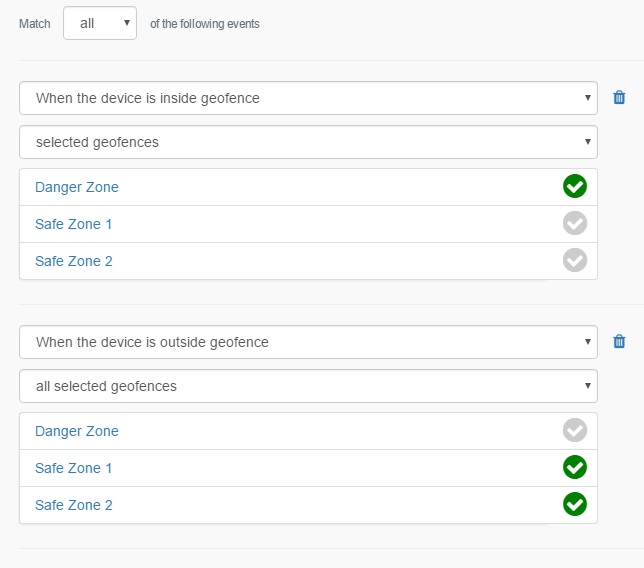
Doughnut Shaped Geofences
Doughnut shaped goefence notifications can be configured using multiple geofences. Consider the example shown below with two Safe Zones inside a Danger Zone.

A rule can be configured to notify whenever the device reports from inside Danger Zone, but outside of one of the two Safe Zones inside.
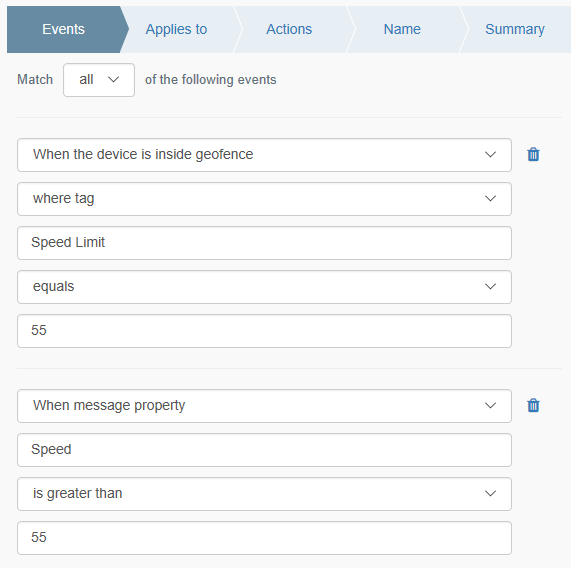
Geofence Tags
Geofence tags allow you to set properties of a geofence, such as a risk level or speed limit. Using the example event notification shown below, you can trigger a notification when a message from a device shows a speed level exceeding a certain limit assigned to one or more geofences: